Saturday, 14 July 2012

Machine Building2...linish, ream, stamp

Linish:
Next on the agenda was to now linish all of the edges & surfaces of the Frames.
I'm using a special Scotchbrite Belt to remove all the various file marks & give the Frames a nice satin finish.

Frames laid out in preparation for their linishing.

Frames on the left & the Scothbrite Belt all set up & ready to go

Another view of that Scothbrite Belt used for linishing.

And so the linishing of the Frames begins. 

Closer view of the freshly linished Frames.


Ream:
After all of the linishing is completed, I then go through & individually hand ream all the Tube holes.
This helps to ensure that both 5/16" & 8mm Tubes (of good quality) will fit correctly into my Machines.

To ensure a nice fit for Tubes, each Frame is individually hand reamed.


Stamp:
I then go through & double check everything is square & aligned correctly.
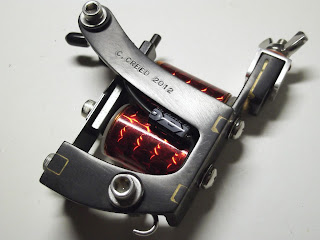
Once I'm sure that each Frame is OK, I then individually stamp them C.CREED 2012

Frame in position ready for it's stamping.

Apologies for slightly out of focus shot...but the stamp was good.

12 x Frames all completed & stamped.


Friday, 6 July 2012

Machine Building2...file, drill, tap

File:
There were 6 x Frames left over that still needed to be cleaned up after being welded & brazed...
...so here's that process with accompanying photos.
Each of the Frames is individually filed as part of the clean up process.
In this photo, the last Frame is waiting to be filed.
A closer view of those Frames.

Drill:
This is part of that whole idea of "work smarter, not harder"
After the last of the 6 x Frames was finished being cleaned up, the next process is to set up for the drilling of the Quickchange.
Because all the Frames are now being laser cut, everything is identical & accurate, so all their holes are in exactly the same spot.
Knowing each Frame would correctly line up in the same position each time, meant I was able to design myself a Jig to hold the Frames, whilst drilling the hole for their Quickchange.

Next comes the drilling to give the Frames their Quickchange.
I've made things easier for myself by building a Jig to suit.
Another view of the Frame set up into the Jig for drilling the Quickchange.

Tap:
After all 12 of the Frames were drilled, the next process was to tap those holes to suit a threaded stud.
I'm using the exact same thread type as found on any standard American made Machines...
...that is 8-32 UNC
I've deliberately chosen 8-32 UNC in an effort to keep things uniform for anyone buying my Machines.
There's nothing more frustrating than reaching for the Allen Key that fits everything else & finding it wont..!


Each of those drilled holes needs to be tapped.


Friday, 22 June 2012

Machine Building2...let the Frames begin!


I've been busily working on the current Orders (Batch 2) for the newly named "Jolly" Machines.
In Batch 2 there's a total of 12 x Machines to be made & they're now well under way.

At present all of these Frames have had their welding & brazing process done.
Then each of those brazed sections is hand filed to remove any excess braze, of which I've currently completed 6 x Frames.

My intention was to take photos of them during each phase of the construction, but unfortunately I've gotten caught up with the actual building, rather than stopping to take photos.
I'll try my best to remember to take more photos when doing the next process.

Here's some photos of how they're looking so far...

All the Frames for Batch 2 are well under way.

Closer view of those welded & brazed Frames.

Closer view of  those filed & cleaned up Frames.


Saturday, 16 June 2012

Machine Building 2...what name for a Frame?

Although it's not critical, it'd be nice to come up with a better name for these new Frames than "new style"!

My original Machines were based on a Bulldog Frame & so I named them after my then recently departed & much loved Aussie Bulldog... "Hugo" ...a simple word association!
...of course this all makes perfect sense if you're Aussie or happen to understand our humour!


What's in the name of a Frame:
Given that these new Frames are my "pirated" version of a Paul Rogers "J" Frame, it follows that the best name for them would be "Jolly"...as in the Jolly Roger used by Pirates...
...again some word associations & a good dose of Aussie humour!!

So there you have it...from here on the new style Machines will be simply known as the "Jolly".

Side view of the "Jolly" Frame
Front view of the "Jolly" Machine


Tuesday, 29 May 2012

Machine Building...comparing the "Testers"

I mentioned at the end of my last post...
"It'll be very interesting to directly compare just how close the two Machines fitted with Lucky Coils will run."

Well, I asked Justin from Eternal Ink to run some direct comparisons between both Machines...
...the Hugo Lucky Coil Tester & the new Lucky Coil Tester.

The two Thin Armature Machines that are fitted with Lucky Coils, sitting side by side.

Justin has run the Hugo Lucky Coil Tester for quite some time now & is really impressed with it...
Check out some of Justin's work using the "Hugo" Liner here & also here.
He's so impressed with this Thin Armature Machine that he hates having to give it back to me!

So what was the verdict from Justin of this new Lucky Coil Tester..?
..."It's pretty close, you can hardly tell any difference between them."

With that confirmation from Justin, I'll now move onto building all the new Orders using this Frame style.

The Hugo Lucky Coil Tester

The new Lucky Coil Tester


Monday, 14 May 2012

Machine Building...new phase "Testers"

Lots been happening, so my apologies in advance for this being such a looong post.

Continuing with the new phase:
I've been working on those new smarter Fames so that I can get them up & running as a set of "Testers".
I figured that 4 x Frames should be enough to test & make sure that everything goes together & works well.

Choose any color, as long as it's Black:
I also decided to try out a new coating using these particular Frames...it's a Black Oxide finish.
This Black Oxide is a special treatment that only colors ferrous metals, in this case the steel Frames.
And all the welded seams show up as gold because I'm using Bronze, which is a non-ferrous metal.

The Testers will then go to Eternal Ink to be used daily & confirm that everything works as expected.
Once proven, this new style Frame will then replace those earlier "Hugo" Frames that I was making.
And all going well, this new Black Oxide will also replace that Clear coating used previously.

Here's a collection of photos showing the progression of these new Frames into Machines & into Testers.

Frames welded & now awaiting their Quickchanges
Frames fitted with Quickchanges & the new Black Oxide finish
Close up of Frame with Black Oxide finish & the Bronze weld seams
Next the assembly is started, Coils fitted & awaiting wiring


This Frame fitted with a set of Lucky Coils

Coils wired, Capacitors fitted & everything soldered


This Frame fitted with a set of Lucky Coils

Springs & Armatures for 3 x Frames
A special Tester, a Thin Armature Magnum...real Aussie Old School
This Tester, a Big Needle Liner
This Tester with the Lucky Coils, a Thin Armature Liner to directly compare against this one

There's still a bit of work to do on these Testers...one still needs a set of Springs made for it & then they'll each require some shimming & tuning.
It'll be very interesting to directly compare just how close the two Machines fitted with Lucky Coils will run.

Tuesday, 1 May 2012

Old Tattoo Video...Signatures of the Soul

I follow a number of Tattoo related Blogs...TAM (Tattoo Artists Magazine) is one of them.
TAM just posted about an old video documentary from 1984 called Signatures of the Soul.


From an old Aussie Tattoo Artist perspective:
By 1984, most Aussies had a variety of US Tattoo Magazines available on our local Newsagents shelves.
As young Tattoo Artists, we were all hungry to see what was the latest trends coming out of the States.
All too often, these US Magazines had the same collection of photos of pretty much the same stuff.

So when this video Signatures of the Soul came along, it was a treasure trove of wonderful new ideas for us.
It also had interviews with all those big named Tattoo Artists we'd been constantly reading about.
Most importantly, it had great info about ALL the (then) current styles we were wanting to do or just seeing.
I still have a copy of this (VHS) video & have often wanted access to an updated digital version to watch.

Thanks to NZ On Screen, now everyone can freely watch the full length video.
http://www.nzonscreen.com/title/signatures-of-the-soul-tattooing-today-1984