Thursday 16 June 2011

My Old Machines...built by others

Continuing with the photo collection:

In the early 90's I was a Member of the then E.T.A.A. (European Tattoo Artists Association) which was based in England.
As a Member you'd get a Newsletter which included interviews with various Artists, Tips & Tricks, etc.
Being as this was a Trade Only Newsletter, there were adverts by various Tattoo Artist, some were selling Machines.
One of those Tattoo Artists selling Machines was Micky Sharpz.

At that time, I'd read several glowing reports on how well Micky Sharpz Machines performed.
Also there was recommendations from some of England & Europe's leading Tattoo Artists who were using them too.
But there was no one that I knew personally here in Australia with any of Micky Sharpz Machines, so it would always be a gamble if his Machines would work that well for me?

There was only one model that was reasonably light in weight, made of iron, & came unplated, it was also offered with a really interesting style of Quickchange.
Of course all of the Micky Sharpz Machines were fitted with a Heavy Armature, but going by photos, this ones geometry looked good, so conversion into Thin Armature was always possible.
So based on all of that, I decided to buy one of his Machines & give it a try.
This Machine had a particular model name, but after nearly 20 years, I can't remember what it was now??

Update:  I've since been reliably informed the model name for this particular Machine was a Hornet.
A Big Thanks goes to Josh Roelink for providing me with that bit of info.

Once the Machine arrived & was in front of me, I felt there was some areas of the Frame that I could "trim some fat off" & make it even lighter without compromising it's strength.
I also ended up modifying the Quickchange as it's original Stud was in an awkward position to lock it up tight.
So with a new Stud welded at a better position, it meant I could easily rotate it closed with my Right Thumb.

When I sold everything, this Machine was still a "work in progress" as it didn't run quite as smooth as I'd have liked it to...
...from memory, my next option was to try swapping out those original Coils to see it that might have helped...
...or possibly just rewind those original ones. (swaps are far quicker & easier to do)

Almost 20 years on, this is how it looks today...a little bit of surface rust, but otherwise OK.

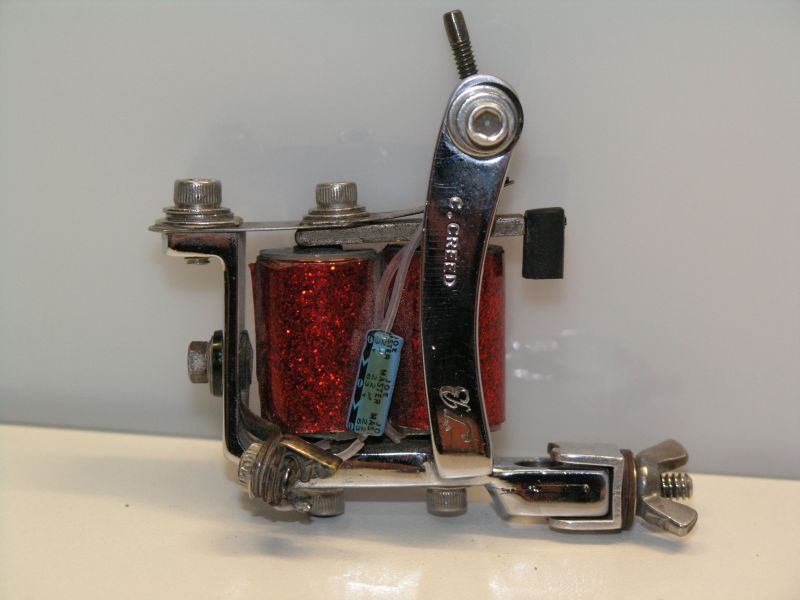
90's model Micky Sharpz Machines known as the "Hornet" with it's interesting Quickchange
The other side of the "Hornet" Machine


This Machine ended up becoming an extra & would sometimes be used as a Round Shader.

More of my Old Machines in the next post...


Sunday 12 June 2011

My Old Machines...the backup ones

Here's some more of what I'd built & these are what I've been referring to as my "backup" Machines.

Continuing with the photo collection:

You'll notice that some of these Machines are all nicely Chrome plated & appear finished, while others are still in a rough state of bare metal.
That's because the ones in bare metal were still being fine tuned or having their Frames tweaked so as to match their everyday equivalent.

Once a backup Machine performed constantly as good as the everyday Machine, the backup was measured, stripped down, polished & sent off to be Chrome plated.
When it returned, that backup Machine would be reassembled, paying close attention to all those measurements that were taken earlier.
When the backup Machine was all assembled, it would be tuned to how it ran prior to the strip down.
This is the same procedure that's previously been described in the post on building the Magnum Machine.

This was my backup Liner.
I built it at the time when the old Australian $5.00 paper note was replaced with it's polymer version.
A flyer was released to show how the new polymer note looked, so I used one for my Coil Covers.
Basically I copied the idea from a US Tattoo Supplier who had Coils with US $100.00 note on them...
...it was a novel idea & so just thought I'd do my own Aussie version of it.


This was my backup Shader (now it would be referred to as a Magnum) 
It was just one in a number of backup Shaders that I was building at the time...
...after all, you could never have too many of them!!
This Frame was given to me with it's Tube Clamp section broken off & the Side Arm missing...
...so with a bit of work & knowledge, I managed to resurrect it.


This was my backup Round Shader & it worked well as a Magnum too.
Notice that this one has Chrome plating.
This Frame was also given to me with it's Tube Clamp section removed...
...so again with a bit of work, I managed to resurrect it.


Stay tuned for more of the Old Machines in the next post...

Saturday 11 June 2011

My Old Machines...the everyday ones

OK, this post is going to be a looong one because there's lots of little things to explain...
...so my apologies for that now!

Read on if you're brave:

As previously mentioned in my first Blog post, I sold everything that was Tattoo related to TonyB.
It's been many years since we'd been in contact & now due to this Blog, we've been able to catch up again.

Here's some photos that form part of the collection of my Old Machines that are now owned by TonyB.
A really Big Thanks goes to TonyB for supplying all of these photos & allowing their use here on the Blog.

TonyB asked if I could possibly provide him with some info & history on each of the Old Machines.
I was happy to oblige, but I will say that some of the Machines did have me racking my brain for answers!
In the pursuit of those answers, one Machine has thrown up an interesting mystery as to it's possible origins...
...so I'll be making a completely separate post dedicated to just that particular Machine later on.

A bit of Aussie history about Machines:
The late 70's saw me start professionally as a Tattoo Artist & so I bought Machines from Wally Hammond.
 (see #14 on this list)   (read even more here)
Wally was another legend of the Australian Tattoo scene who owned & operated the first ever professional Tattoo Studio at Kings Cross in Sydney.
Wally also built & supplied his own line of Machines as well as a range of raw Pigment from local sources.
Those Machines came fitted with Thin Armatures because locally that's what was made & used by the majority of Aussie Tattoo Artists.
Those Wally Hammond Machines were later pulled down for spare parts or became Frames for some other Machines that were later sold.
Regrettably they're not part of this collection, but the knowledge they provided me would prove invaluable.
And here's a rough version of what those old Wally Hammond Machines used to look like.

The early 80's saw me buying my first ever set of USA made Machines from one of the well known Tattoo Suppliers.
These Machines came fitted with their standard Armatures, these were referred to as Heavy Armatures by the majority of us who knew the difference.
Machines with a Heavy Armature run completely different to those with Thin Armatures & so I had to learn a whole new way of building, running & the tuning of these Machines.
So by the mid 80's, after constantly trying different ideas, setups & configurations for tuning, I finally had Heavy Armature Machines that worked really well.
By this time, I was now building & tuning Heavy Armature Machines for a number of other Melbourne based Tattoo Artists.
Because of this, I started stocking up on those items that I'd need to do the rebuilds or tuning for others.
The big advantage was the uniformity, inter-changeability & availability of all these parts from various USA Suppliers.

The start of the 90's saw me working for Dan Robinson Snr.
All of Dan's Machines were fitted with Thin Armature, always had been & the quality of his work spoke for itself.
Dan asked "why is it that all you young ones insist on using those slow running pieces of shit?"
He was referring to the Heavy Armatures I had on my Machines.
So Dan gave me a try of his Machines & I noticed immediately the difference between them, Dan's Machines reminded me of those old Wally Machines.
One Tattoo later & I was convinced...I converted my then two Machines into Thin Armature & set about trying to relearn all those old tuning tricks associated with them.
And so I continued using & building Thin Armature Machines right up until I retired in the mid 90's.
Those same USA Machines I'd first bought back in the early 80's went on to become my everyday Machines.

Things to note about these Old Machines:
All of these Old Machines share several things in common.
  • They're all fitted with a Thin Armature Bar & they use a Rubber Block.
  • The Rubber Block was used in conjunction with a Straight Shaft Needle Bar.
You'll also notice that they're all fitted with a Plug connection which is a 3.5mm Mono Audio...
...believe me when I say it's far superior to either a Clip Cord or an RCA Plug!!


I'm sure that most of you will notice that the majority of these Machines are pretty rough & rugged looking, especially the ones listed as the "primary or everyday Machines".
As these were constantly in a state of use day in & day out, it meant I couldn't afford to strip them down to be polished & plated until I had a viable replacement for it.
For the majority of my career, I worked with only two Machines & if one failed or broke, I'd then spend all night getting it repaired, tuned & ready for work the next day.
I finally decided to build myself a set of backup Machines that were basically copies of the everyday ones...
...and as with most copies, they never seemed to run quite the same as the original one!

And so those originals just continued to be used, day in & day out...
...it was much more important to produce quality Tattoos than to have "pretty looking" Machines!!

This was my primary or everyday Liner.
Having done a rebuild which included mods to the Frame, it was reassembled just to test run...
...but the old saying "if it runs well, then leave well enough alone" seemed to apply to this Machine!
It always ran so well & consistent that it was almost impossible to consider ever stripping it down.


This was my primary or everyday Round Shader. 
This Machine was built as a copy (backup Liner) to the one above, but it just ran better as a Shader.


This was my primary or everyday Shader. (now it'd be called my Magnum).
Another of those Machines that always ran consistently well that it never got stripped down.


This was my AC (Alternating Current) Shader. (now it'd be called my AC Magnum).
Most old AC Machines usually ran a one piece Spring, so this one was also setup that way.

There'll be more Old Machines in the next post...

Friday 10 June 2011

Machine building...a new spring & all runs well

Since changing the previously broken Top Spring, the Magnum Machine has been working fine.
Donny from Eternal Ink has continued using the Machine whenever he can & reports no problems with it.
And so I guess this would seem to prove that the current Spring material is also up to the task at hand.

That broken Top Spring once it was removed

I recently received a photo collection of my Old Tattoo Machines & have been busy compiling the info on them.
So stay tuned for the next Blog post...