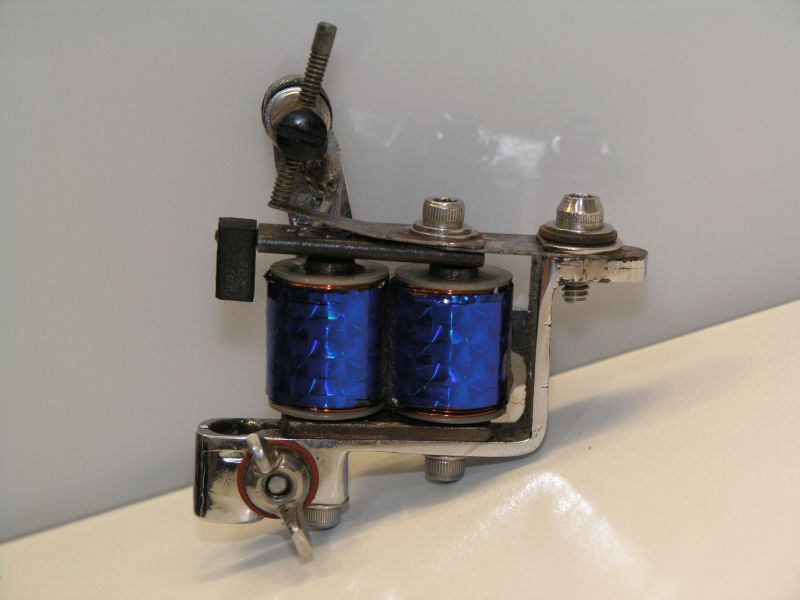
Monday, 21 November 2011

Ordering Machines...if you're interested

For those of you interested in owning one of my Machines, then here's what you'll need to do.

Please send me an email that states which Machine type that you're wanting...

  • Liner - Heavy Armature
  • Round Shader/Color - Heavy Armature
  • Magnum Shader/Color - Heavy Armature
I'll then send you a reply email to confirm your Order & clarify any details I might require.
This reply email will also state the cost of the Machine as well as the Postage & Insurance costs.
All Orders will have an Invoice supplied & payments can be made via PayPal


Important - Please Note: 
Because each Machine being ordered is totally handmade, tested, tuned & then run-in, all of which means...

  • no two Machines will be identical, only similar looking.
  • there is NO STOCK being made or kept of these Machines. 


For those of you that have already sent emails placing Orders.
Be assured that I'm presently working on those Machines & should have them ready for the New Year.

Sunday, 13 November 2011

Lucky Museum Machine...all finished

When I first started out to build this Machine, I set myself a deadline for it to be all finished...
...ideally the first week of November or the second week at the very latest!!

So first thing tomorrow morning (Monday 14th November), this Luckys Museum "Hugo" Machine is off to it's new home at Luckys Tattoo Museum in the States.

In the last Blog post, this Machine had just been fine tuned & tested on myself, leaving only the running in process to be completed.
The running in was already well under way, with a large tattoo already completed & a full arm sleeve being outlined with it, when Murphy's Law struck...
...a broken Top Spring & it was exactly what had previously happened to the Magnum prototype.
Given that it was from that very same batch of Spring material, I decided to totally change the Top & Back Springs to a different, but already proven material that I'd only just acquired.

Of course that meant I now had to redo all the fine tuning & testing again, then repeat the measuring, to be followed by the strip down, then chrome plating, etc...
...my deadline was now fast running out..!


Utilise those resources that are close to you:
Where I'm building all of these Machines is at a factory owned & operated by some friends, one of them is a young guy named Anthony who's a Spray Painter.
Whilst discussing how this Machine build was progressing, Anthony suggested he could spray paint the Frame & thus regain me some of the already lost time.
Anthony chose to use a super tough paint that when dry, is totally impervious to any solvents, most of which wouldn't ever be used within a Tattoo Studio anyway!!
Anthony also chose to use a Clear, so that it could always be seen how this Machine was constructed & that it was totally hand built.
So a really Big Thanks goes to Anthony.

With the Frame all nicely painted & rock hard, I moved straight into the reassembly & then retuning.
This was followed by some quick tests on my foot again, just to be sure that everything was working well.
The final result, a voltage range from 10V through to 11.5V & drawing no more than 0.31A.

Here's the finished product.

Luckys Museum "Hugo" Machine complete with Tube, Grip & spare Springs 

This Machine pretty much represents what I'd managed to learn as an Aussie Tattoo Artist, if you wanted to do Tattooing, you had to make the majority of equipment & components yourself.
So figured it was only fitting that I should also hand make a one piece Tube with a replaceable Tip.
I've not made this actual Grip, but had a number of them produced to how I used to make them myself, which includes the 3 grooves at the Tip end to identify my Tubes & Grips when working with other Tattoo Artists.


A quick trip down Memory Lane:
Next on my agenda was to get this Machine safely packaged & ready for postage to the States.
I started thinking about forms of packaging which included Bubble-wrap & other such things.
Whilst contemplating all this, my thoughts wandered back to the old days of seeing the Aussie Old Timers with Gladstone Bags & their Machines safely wrapped up inside...
...their Machines were always safely wrapped up within an old tea towel.
It's something of which I still do to this day when transporting the prototype Machines back & forth for testing to Eternal Ink.

So I thought it was kind of fitting to ship this "Old Style" Machine wrapped up in an "Old School" way...
...in this case it's a typical Aussie Tourist one.


The Luckys Museum "Hugo" Machine all safely wrapped & ready to go

Sunday, 23 October 2011

Lucky Museum Machine...testing, testing

Since my last post, I finished making parts & doing all the assembly for the Luckys Museum "Hugo" Machine.
With that all done, next on my agenda was:
  • get it running.
  • establish it's optimum voltage range while drawing the minimum amps.
  • fine tune it to work smoothly within that voltage range.
  • test how well it will lay ink into skin.
Luckys Museum "Hugo" Machine assembled & awaiting tests


Why run tests:
I'll state here & now that I've no idea how others go about testing their newly built Machines...
...and nor do I profess to have all the answers needed to build Machines...

I know what works for me, so I'm following a tried & proven process that I've always used.
And in doing so, those same processes are continuing to work well for these current Machines.

Part of that process involves testing how well the Machine will lay (punch) ink into the skin.
Being a typical Old School Tattoo Artist, I only use myself as the "Guinea Pig" to run the first tests & have found my foot & ankle to be the best "test subject".
On the foot, you'll find the skin structure changes quite dramatically within a small space & so it allows you to test hard into soft skin, including taunt & loose skin. 
If you've got a preference for Big Liners, then you can quickly establish if the Machine is going to be up to the task of punching a large pattern into tough, hard skin.

I decided on using a 9 Liner for my tests...
...this Machine just pushed the ink in without any dramas!
I even used it like a Round Shader at one stage, just to see if it could keep up & continue laying ink in...
...this Machine didn't miss a beat!
Here's a photo showing my foot with it's new additions...
...they now join all those other test results from 20+ years of Machine building.

My foot with the results from testing this new Machine

I've tuned this Machine to run exactly how all the Aussie Old School Tattoo Artists ran their Thin Armature Machines...fast!!
As with all the Machines I've built, they're designed to work within a range so that you can use a variety of different sized Liners, using just that one Machine.
In this case, the Luckys Museum "Hugo" Machine can run 3, 5, 7, 9 & most likely an 11 Liner just by dialling up through it's voltage range.
This Machine has a voltage range from 9V through to 11V & draws low amps of 0.3A to just over 0.35A.


Thursday, 13 October 2011

Lucky Museum Machine...aka the "Hugo"

As mentioned in the previous post, I'm building a Thin Armature Machine for Luckys Tattoo Museum.
The Museum is part of Luckys Tattoo & Medical Supplies which is owned by Jimmy Whitlock.


What's in the name of a Frame:
Whilst looking at the prototype Machines, Jimmy happened to mention that my Frames looked similar to a Bulldog style of Frame.
Strangely enough, it was only from looking through Jimmy's online Tattoo Museum that I'd recently found out that there was an actual name for this style of Frame...you live & learn!!

So I guess these Frames that I'm making are what you'd call an "Aussie" Bulldog.

All of which is kind of ironic because our beloved pet dog was an Aussie Bulldog named Hugo.
Sadly though after 11 years, Hugo is no longer with us.
So if these Aussie Bulldog Frames must have a distinct name to go by, then I'll just call them a "Hugo".

Hugo 


Luckys Museum "Hugo" Machine:
I've managed to make a good start & so have finished hand making the Frame.
All of the current Frames will be stamped with my name followed by the year they've been made, so in this case it reads:  C.CREED 2011

Still need to cut a Top Spring to suit, finish all the assembly, then it's time to do some fine tuning.
As with all my Machines, it will be run as is to allow everything to bed in properly, then measured, stripped down & the Frame will go off to be chrome plated to stop any rusting.
Once back from the Chromers, everything will be reassembled to the previous measurements, tuned & used a number of times to test everything is still all working correctly.
Then it'll be posted off to Jimmy for his Tattoo Museum.

Here's some photos of how it's looking like so far.


Wednesday, 21 September 2011

Melbourne Tattoo Expo...great event

By what I've read & have heard, it seems that the Melbourne Tattoo & Body Art Expo was huge success.

Attended the Expo on the Sunday, got there for the 11am opening & was there for the best part of the day.
It was a huge surprise to bump into a number of the "Old School" Tattoo Artists, have a chat & generally catch up after all these years.

I was very fortunate to be introduced to some of the new generation of Tattoo Artists who are doing some really amazing work.
This also allowed me the opportunity to show them the newly built Tattoo Machines, which by all accounts everyone seemed to be impressed with.

I also had the opportunity to meet with the guys from Luckys Tattoo & Medical Supply.
I'm honoured to be supplying a Thin Armature Machine to add to the collection that's on display at the Luckys Tattoo Museum.

Saturday, 17 September 2011

Melbourne Tattoo Expo

There's a Tattoo Convention on this weekend... Melbourne Tattoo & Body Art Expo


It's been a long time since I've attended anything like this, so decided to go to the Sunday session.
I intend on taking the newly built Tattoo Machines so that they can be viewed or even tried whilest I'm there.
So looking forward to catching up with any of the Tattoo Artists that are following this Blog.

Sunday, 28 August 2011

My Old Machines...with mysterious origins [SOLVED]

Continuing with the photo collection:

In an earlier Blog post, I made mention of "one Machine having thrown up an interesting mystery as to it's possible origins"...
Well that particular Machine was the very first that I ever owned & was bought from Chris "Spider" Webb.
And so over the years I've always referred to it as my "Webb Machine".

Below are photos of how the Webb Machine currently looks. (Thanks again to TonyB for these photos)
It should be noted that I modified & rebuilt this Machine a number of times since 1975.
Unfortunately there's no photos of how it originally looked when it was first purchased from Chris Webb.
(it originally looked like the "Sailor Jerry" versions but mine had a set of round Bobbin Coils)


This Machine was used as my Round Shader or sometimes if needed, my Big Needle Liner. (also as a backup Liner)
Over the years this Machine went through quite a number of different setups & configurations.
At one stage it was setup to run as my primary or everyday Liner.
The Frame was modified in a number of ways to suit my requirements & the needs of those different setups.
  1. The Spring Shelf thickness was increased to allow more screw threads & add better clearance for the Armature.
  2. The old Bracket across the bottom of the Frame was removed & a new Bracket added to the Frame for fitting a Plug connection.
  3. The Side Arm width was reduced & reshaped slightly where it meets the front section of the Frame.
  4. The Tube Clamp originally used an Allen Head screw, so a threaded Stud was welded in & a Wingnut now forms something closer to a modern Quickchange.
  5. The area below the Tube Clamp was reduced to allow a shorter length screw to be used to fix the Top Coil into place.
  6. The hole for Top Binding Post was enlarged & elongated to allow a slightly better position for the alignment of the Contact Screw & Top Spring.
The original old round Bobbin Coils were replaced during a total rebuild in the early 1990's with a set of "Shorty" versions.
During that same rebuild the Frame was sent off to be chrome plated, but not polished.


My association with this Machine:
I originally bought this Machine from Chris for the grand sum of $20.00 which was almost half my weekly wage as an apprentice Jeweller back in 1975.
The purchase price included a Liner Tube, a Round Shader Tube as well as a Needle Bar.
The Frame was hand fabricated from flat mild steel strap & had some form of Blackening to protect it from rusting.
This Machine was fitted with handmade round Bobbin style Coils. (alas no longer in the present Machine)
Chris told me that it was a Machine he'd been given by Des Connolly, who was another of Melbourne's Tattoo Artists.

The history of this Machine:
As stated above, this Machine had originally come from Des Connolly.
Des was a Pattern Maker by trade & created the patterns needed by Foundries to cast various items in metal.
Chris's knowledge on building Machines was highly respected & so Des would give Machines to Chris for appraisal, others for Chris to test & keep.
From what I understood at the time, my Machine was one of those that Chris had tested & kept.

And that's about where I'd thought the history for this "Webb Machine" started & ended...
...that is until recently looking through some Tattoo Museum websites with old Tattoo Machines in them.
I'm now wondering if there's a bigger mystery as to it's true origin going by some of the photos I've now found at these various sites??

Questions about this Machine:
Des knew Sailor Jerry quite well & they both corresponded with each other swapping ideas, designs, Pigment & Machines.
A number of those Machines that they traded back & forth were prototypes, testers or working concepts.
Having only recently seen photos of the Machines owned & used by Sailor Jerry, there's a remarkable similarity between them & the original Webb Machine.

I do know that Des was casting iron Frames here in Australia for Jerry back in the very early 70's.
So I can only speculate that prior to his death in 1973, Jerry possibly sent a Machine to Des, that later was given to Chris & then onto me? *
Another possibility is that Des was the one making these particular Machines & had given them to both Jerry & Chris to test & use??

Unfortunately I've no real way of confirming either of these suspicions, as Des Connolly died in 1985.
There's a chance that Chris Webb may know the true story, but I lost contact with him many years ago.
Hopefully someone reading this Blog post might be able provide more info..?
...my research on this will continue...

Update 2022:   CASE SOLVED
A recent visit to my old tattoo mate & fellow Machine Builder, Steve Paul has shed more light on this particular Machine.
Based on correspondence between Des & Jerry, it now turns out that Alf Mingins was also heavily involved with these particular Machines.
Both Alf & Jerry were part of an "exchange of ideas" involving a particular "E" Coil & Thin Armature Machine being made by Alf & Des then shared with Jerry for his input.
(this now accounts for "why" the Jerry Machines had features & screw threads NOT normally being used by American Builders) 

Several of Alf's old Machines are now part of Brett Stewart's Australian Tattoo Museum.
Brett has made a number of posts to his Facebook & Instagram Pages showing Alf's Machines & they feature the "E" Coil but their Frames are identical to how mine was originally.
Happy to say this is:  CASE SOLVED